terbaca ini di status fb orang:
semak originality handphone:
taip kat hp *#06#
akan keluar IMEI [ International Mobile Equipment Identity]
semak nombor IMEI handphone anda di kedudukan 7 dan 8
... contoh : 358671017470473...
kedudukan ke 7 dan 8 ialah ******01*******
utk semak ori ke x hp tu,
status nye adalah seperti di bawah:
02 or 20 : dari China = LOW QUALITY
08 or 80: dari Germany = FAIR QUALITY
01 or 10: dari Finland = VERY GOOD
00 or 03 or 04: dari kilang asal handphone = BEST MOBILE QUALITY
13 : dari azerbaijan =VERY BAD QUALITY & DANGEROUS FOR HEALTh

Showing posts with label how to ___. Show all posts
Showing posts with label how to ___. Show all posts
Saturday, October 8, 2011
Wednesday, September 28, 2011
How to Detect Hidden Camera in Trial Room? HOW TO DETECT A 2-WAY MIRROR?
got this from FB. Please read and forward~ TQ
How to Detect Hidden Camera in Trial Room?
In front of the trial room take your mobile and make sure that mobile can make calls........
Then enter into the trail room, take your mobile and make a call.....
If u can't make a call......!!!!
There is a hidden camera......
This is due to the interference of fiber optic cable during the signal transfer......
Please forward this to your friends to educate this issue to the
public......To prevent our innocent ladies from HIDDEN CAMERA...........
Pinhole Cameras in Changing Rooms of Big Bazaar, Shoppers Stop?
A few days ago, I received this text message:
Please don't use Trial room of BIG BAZAAR there are pinhole cameras to make MMS of young girls.
So, please forward to all girls. Also forward to all boys who have sisters and girlfriends.
Don't be shy in forwarding this message. Because its about protecting the integrity of all girls & ladies.
HOW TO DETECT A 2-WAY MIRROR?
When we visit toilets, bathrooms, hotel rooms, changing rooms, etc., How many of you know for sure that the seemingly ordinary mirror hanging on the wall is a real mirror, or actually a 2-way mirror I.e., they can see you, but you can't see them. There have been many cases of people installing 2-way mirrors in female changing rooms or bathroom or bedrooms.
It is very difficult to positively identify the surface by just looking at it. So, how do we determine with any amount of certainty what type of Mirror we are looking at?
CONDUCT THIS SIMPLE TEST:
Place the tip of your fingernail against the reflective surface and if there is a GAP between your fingernail and the image of the nail, then it is a GENUINE mirror.
However, if your fingernail DIRECTLY TOUCHES the image of your nail, then BEWARE, IT IS A 2-WAY MIRROR! (There may be someone seeing you from the other side). So remember, every time you see a mirror, do the "fingernail test." It doesn't cost you anything. It is simple to do.
This is a really good thing to do. The reason there is a gap on a real mirror, is because the silver is on the back of the mirror UNDER the glass.
Whereas with a two-way mirror, the silver is on the surface. Keep it in mind! Make sure and check every time you enter in hotel rooms.
Share this with your sisters, wife, daughters, friends, colleagues, etc.
Pass this message to all Ur friends in the Contacts.
21 - August - 2011
By: Sanaulla Shoupa
Monday, July 11, 2011
cara untuk tukar log on screen PC~
jemu dengan log on screen pc korang?
seperti ini:
 dan ini:

korang teringin x nak tukar?
jadi seperti ini:

atau sebarang gambar fevret korang yang lain?
jika ya,
sila klik sini~
selamat mencuba~~~
**macam iklan ape je**
seperti ini:

korang teringin x nak tukar?
jadi seperti ini:
jika ya,
sila klik sini~
selamat mencuba~~~
**macam iklan ape je**
Monday, June 7, 2010
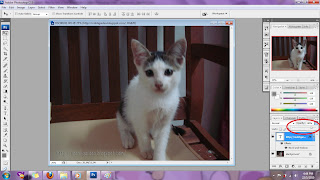
Mencapub menggunakan photoshop!!
macam mana nk menyerlahkan diri kita dlm gambar yg ade rmai makhluk?
jom kite gune adobe photoshop!!
seswai utk org yg gemar mencapub ;p *guraw je*
ok. mula2 korg kene la bukak program adobe photoshop:
1. Open gambar yg korg nk~

2. dlm tool box di seblah kiri skrin right-click pada lasso tool & pilih magnetic lasso tool.

3. tetapkan feather kat bhgn atas tu kepada 5-10 (bergantung pada size objek yg ingin dicapubkan). feather nie digunakan utk 'smooth edges' objek yg dipilih nnt~ kemudian, dgn berhati2,buat outline pada objek yg diingini dgn menggerakkan magnetic lasso mengikuti rupa objek~

4. di bahagian menu bar di atas, pilih Select > Inverse. Ini akan menyebabkan korg akan melakukan sebarang 'editing' selepas ini di bahagian selain drpd objek yg korg pilih td~

5. Sekarang, masih di menu bar, pilih Image > Adjustment > Black & White.

6. Pilih 'OK' utk pop-up yg timbul.

7. terakhir, click 'ctrl + h' utk buangkan segala 'dotted line' . TADAAA!! kn menyerlah tu!

kalau korg nak capubkan lebih dr 1 objek, lain plak cara nya.
banyak cara sebenarnya nk wat benda nie,
sajer aku ingin berkongsi.
lain kali aku kongsi macam mana nak capubkan byk objek plak ok?
p/s: TQ wan sebab sudi jadi model capub aku.. ngee~
amaran: perkataan CAPUB tidak ada dlm kamus. pelajar2 tidak dibenarkan menggunakannya di dlm surat rasmi atau sebarang karangan homework! ia adalah penggunaan kasar semata2~
Saturday, May 22, 2010
Watermark gambar
Aku akan tunjukkan cane nk watermark gmbar korang supaya bila korang publishkan gmbar korang di web, gambar itu akan ade nama korang dan mengelakkan org lain copy (kalau dia nk copy jugak, ha, copy ler skali ngan nama2 korang tu)
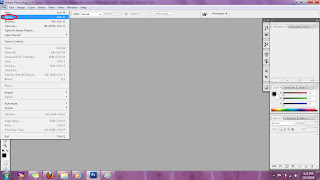
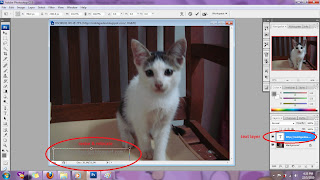
1. Bukak Adobe Photoshop. *klik gambar untuk lihat lebih jelas*
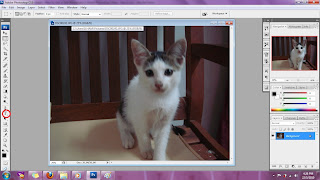
2. 'Open' gambar yg korang nk tandakan 'watermark'.
3. Pilih 'Type Tool' dan taip apa yang korang nak sebagai tanda gmbar itu korang punye.
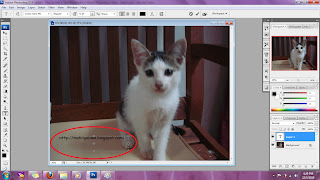
4. 'Highlight' kan tulisan yg korang taip td, then pergi ke 'color' tab kat seblah kanan skrin, setkan RGB ke nilai 128. Ini akan menyebabkan tulisan korang akan berwarna kelabu.
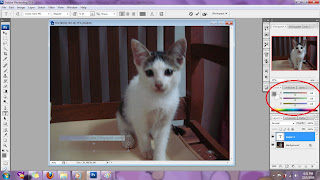
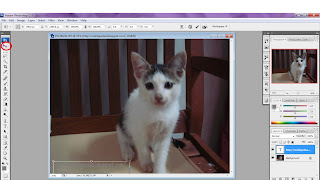
5. Ubah saiz tulisan korang(klik ctrl + t) .Pastikan korang wat sume keje nie atas 'text layer'(automatik ada bila korg taip td).
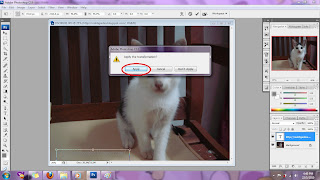
6. Da puas hati? skrg, korang klik 'move tool' dlm 'tool box' tu, nanti satu pop-up akan muncul & korang kene klik 'Apply'. Sekarang korg bley ubah kedudukan tulisan tu plak.
7. Kat atas skrin korang, bahagian 'Menu bar', korang klik 'Layer' > 'Layer Style' > 'Bevel and Emboss'.
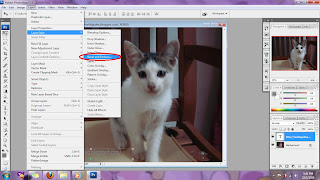
8. Satu skrin 'Layer Style' akan muncul, korang bley ubah bahagian 'depth' tu sesedap rasa. ikut citarasa korg la...
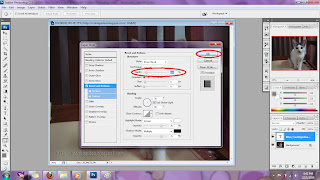
9. skrg nie, korang tgk pulak kat bhgn 'Layer' tab, cari 'Opacity'. Bahagian ini mengawal kejelasan tulisan korang, korang bley ubah peratusnya smpai korg rasa puas hati.
10. TADAA!!! siap da, sekarang bley klik 'move tool' kalau korang ada x puas hati lg dengan kedudukan, dan korang juga bley 'rotate' tulisan tu. Untuk mengubah size, tekan 'ctrl + t' atau pilih 'Edit' > 'Free Transform' drpd 'Menu bar'.
sekian :)
dirujuk drpd : http://video.about.com/graphicssoft/Watermark-Images-in-Photoshop.htm#
1. Bukak Adobe Photoshop. *klik gambar untuk lihat lebih jelas*
2. 'Open' gambar yg korang nk tandakan 'watermark'.

3. Pilih 'Type Tool' dan taip apa yang korang nak sebagai tanda gmbar itu korang punye.


4. 'Highlight' kan tulisan yg korang taip td, then pergi ke 'color' tab kat seblah kanan skrin, setkan RGB ke nilai 128. Ini akan menyebabkan tulisan korang akan berwarna kelabu.

5. Ubah saiz tulisan korang(klik ctrl + t) .Pastikan korang wat sume keje nie atas 'text layer'(automatik ada bila korg taip td).

6. Da puas hati? skrg, korang klik 'move tool' dlm 'tool box' tu, nanti satu pop-up akan muncul & korang kene klik 'Apply'. Sekarang korg bley ubah kedudukan tulisan tu plak.


7. Kat atas skrin korang, bahagian 'Menu bar', korang klik 'Layer' > 'Layer Style' > 'Bevel and Emboss'.

8. Satu skrin 'Layer Style' akan muncul, korang bley ubah bahagian 'depth' tu sesedap rasa. ikut citarasa korg la...

9. skrg nie, korang tgk pulak kat bhgn 'Layer' tab, cari 'Opacity'. Bahagian ini mengawal kejelasan tulisan korang, korang bley ubah peratusnya smpai korg rasa puas hati.

10. TADAA!!! siap da, sekarang bley klik 'move tool' kalau korang ada x puas hati lg dengan kedudukan, dan korang juga bley 'rotate' tulisan tu. Untuk mengubah size, tekan 'ctrl + t' atau pilih 'Edit' > 'Free Transform' drpd 'Menu bar'.
sekian :)
dirujuk drpd : http://video.about.com/graphicssoft/Watermark-Images-in-Photoshop.htm#
Subscribe to:
Posts (Atom)